 DQ博客
DQ博客切换主题
二、ByteBuffer
示例代码:读取文件
java
@Slf4j
public class TestBufferByte {
    public static void main(String[] args) {
        try (FileChannel channel = new FileInputStream("data.txt").getChannel()) {
            ByteBuffer buffer = ByteBuffer.allocate(10);//开辟缓冲区

            while(true){
                int len = channel.read(buffer); //从channel读取数据,并写入buffer
                if(len == -1){
                    break;
                }
                buffer.flip();//切换只读模式
                while (buffer.hasRemaining()) {
                    log.debug("读到的字节 {}",(char)buffer.get());
                }
                buffer.clear();//让缓冲区回到「写入模式」
            }
        } catch (IOException e) {
        }
    }
}一、ByteBuffer 结构
ByteBuffer 有以下重要属性
- capacity
- position
- limit
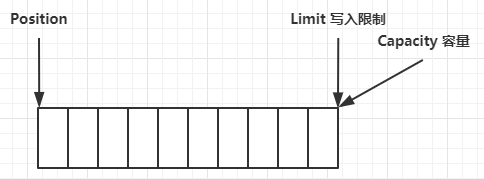
1、图片演示
一开始
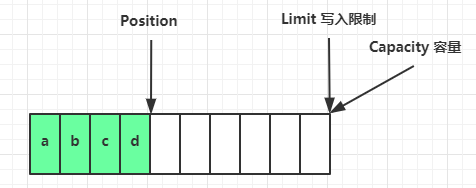
写模式下,position 是写入位置,limit 等于容量,下图表示写入了 4 个字节后的状态
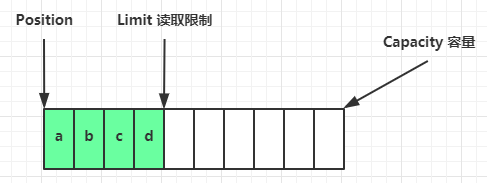
flip 动作发生后,position 切换为读取位置,limit 切换为读取限制
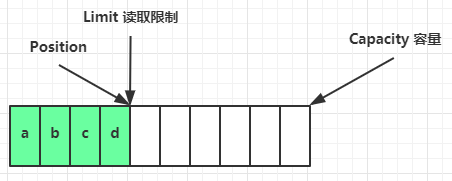
读取 4 个字节后,状态
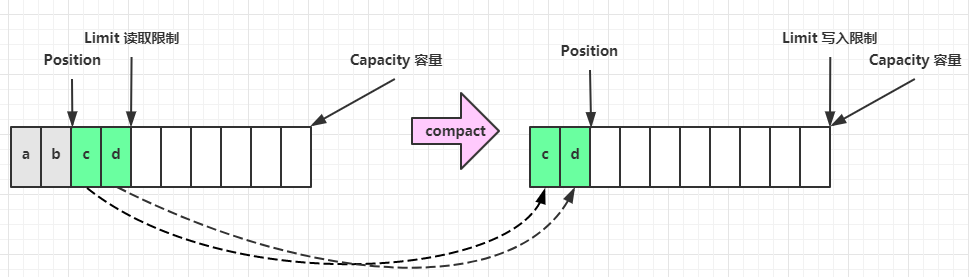
clear 动作发生后,状态
compact 方法,是把未读完的部分向前压缩,然后切换至写模式
2、代码演示
ByteBufferUtil 链接
java
import static utils.ByteBufferUtil.debugAll;

public class TestBufferByte {
    public static void main(String[] args) {
//        分配缓冲区10个字节
        ByteBuffer buffer = ByteBuffer.allocate(10);
//        插入字符a
        buffer.put((byte) 0x61);
        debugAll(buffer);

//        插入字符b、c、d
        buffer.put(new byte[]{0x62,0x63,0x64});
        debugAll(buffer);

//        转为写模式,改变position回到开头,进行读取
        buffer.flip();
        System.out.println(buffer.get()); //打印92,十进制

//        未读完的部分向前压缩
        buffer.compact();
        debugAll(buffer);

//        插入新元素
        buffer.put(new byte[]{0x65,0x6f});
        debugAll(buffer);
    }
}二、常见方法
1、分配空间
可以使用 allocate 方法为 ByteBuffer 分配空间,其它 buffer 类也有该方法
java
Bytebuffer buf = ByteBuffer.allocate(16);2、向 buffer 写入数据
有两种办法
- 调用 channel 的 read 方法
- 调用 buffer 自己的 put 方法
java
int readBytes = channel.read(buf);和
java
buf.put((byte)127);3、从 buffer 读取数据
同样有两种办法
- 调用 channel 的 write 方法
- 调用 buffer 自己的 get 方法
java
int writeBytes = channel.write(buf);和
java
byte b = buf.get();get 方法会让 position 读指针向后走,如果想重复读取数据
- 可以调用 rewind 方法将 position 重新置为 0
- 或者调用 get(int i) 方法获取索引 i 的内容,它不会移动读指针
4、mark 和 reset
mark 是在读取时,做一个标记,即使 position 改变,只要调用 reset 就能回到 mark 的位置
java
ByteBuffer buffer = ByteBuffer.allocate(10);
buffer.put(new byte[]('a', 'b', 'c', 'd'});
buffer.flip();

// mark & reset
//mark做一个标记,记录position位置,reset是将position重置到mark的位置
System.out.printin((char) buffer.get());
System.out.println((char) buffer.get());
buffer.mark();//加标记,索引2的位置
System.out.println((char) buffer.get());
System.out.printin((char) buffer.get());
buffer.reset();//将position重置到索引2
System.out.println((char) buffer.get());
System.out.println((char) buffer.get());5、rewind
从头开始读
java
ByteBuffer buffer = ByteBuffer.allocate(10);
buffer.put(new byte[]('a', 'b', 'c', 'd'});
buffer.flip();

//rewind从头开始读
buffer.get(new byte[4]);
debugAll(buffer);
buffer.rewind();
System.out.println((char)buffer.get());flip和rewind的区别
flip():「写模式 → 读模式」的切换操作将
limit设为「当前position的值」(锁定读取范围为刚写入的所有数据);将
position设为 0(回到缓冲区开头,准备读取)。
rewind():「读模式下的重读操作」(已在读模式,想重新读)- 仅将
position设为 0,limit保持不变。
- 仅将
6、字符串与ByteBuffer互转
代码实例
java
public class TestByteBufferString {
    public static void main(String[] args) {
//        1、字符串转为ByteBuffer
        ByteBuffer buffer1 = ByteBuffer.allocate(16);
        buffer1.put("hello".getBytes());
        buffer1.flip();
        debugAll(buffer1);

//        2、Charset
        ByteBuffer buffer2 = StandardCharsets.UTF_8.encode("hello");
        debugAll(buffer2);

//        3、wrap
        ByteBuffer buffer3 = ByteBuffer.wrap("hello".getBytes());
        debugAll(buffer3);

//        4、转为字符串
        String str1 = StandardCharsets.UTF_8.decode(buffer3).toString();
        System.out.println(str1);

        String str2 = StandardCharsets.UTF_8.decode(buffer2).toString();
        System.out.println(str2);
    }
}三、集中写和分散读
1、Gathering Writes
代码示例
java
public class TestGatheringWrites {
    public static void main(String[] args) {
        ByteBuffer buffer1 = StandardCharsets.UTF_8.encode("Hello");
        ByteBuffer buffer2 = StandardCharsets.UTF_8.encode("World");
        ByteBuffer buffer3 = StandardCharsets.UTF_8.encode("哈喽!");

        try (FileChannel channel = new RandomAccessFile("word.txt", "rw").getChannel()) {
            channel.write(new ByteBuffer[]{buffer1, buffer2, buffer3});
        } catch (IOException e) {
        }
    }
}2、Scattering Reads
代码示例
java
public class TestScatteringReads {
    public static void main(String[] args) {
        try (FileChannel channel = new RandomAccessFile("word.txt", "r").getChannel()) {
            ByteBuffer buffer1 = ByteBuffer.allocate(5);
            ByteBuffer buffer2 = ByteBuffer.allocate(5);
            ByteBuffer buffer3 = ByteBuffer.allocate(9);

            channel.read(new ByteBuffer[]{buffer1, buffer2, buffer3});
            buffer1.flip();
            buffer2.flip();
            buffer3.flip();
            debugAll(buffer1);
            debugAll(buffer2);
            String string = StandardCharsets.UTF_8.decode(buffer3).toString();
            System.out.println(string);

        } catch (IOException e) {
        }
    }
}四、黏包和半包
示例:
网络上有多条数据发送给服务端,数据之间使用\n进行分隔 但由于某种原因这些数据在接收时,被进行了重新组合,例如原始数据有3条为 Hello,world\n I'm zhangsan(n How are you?In 变成了下面的两个byteBuffer(黏包,半包) Hello,world\nI'm zhangsan\nHo w are you?In 现在要求你编写程序,将错乱的数据恢复成原始的按\n分隔的数据
代码示例
java
import static utils.ByteBufferUtil.debugAll;

public class TestBufferByteExam {
    public static void main(String[] args) {
        ByteBuffer buffer = ByteBuffer.allocate(32);
        buffer.put("Hello,world\nI'm zhangsan\nHo".getBytes());
        split(buffer);
        buffer.put("w are you?\n".getBytes());
        split(buffer);
    }

    private static void split(ByteBuffer buffer) {
        buffer.flip();
        for(int i =0 ;i < buffer.limit();i++){
            if(buffer.get(i) == '\n'){
                int length=i-buffer.position()+1;
                ByteBuffer target = ByteBuffer.allocate(length);
                for(int j=0;j<length;j++){
                    target.put(buffer.get());
                }
                debugAll(target);
            }
        }
        buffer.compact();
    }
}